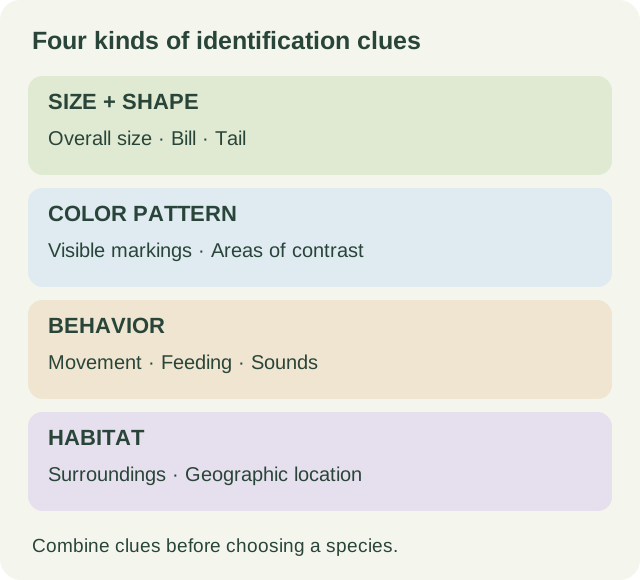
Start with broad groups and a few familiar local birds. Recognizing a duck, woodpecker or raptor narrows the possibilities before you look for fine markings. Pick one common species, learn its outline and typical behavior, then compare the next unfamiliar bird with it. Building these reference points is more manageable than trying to memorize an entire field guide at once.
Write down or sketch what you actually noticed: overall shape, distinctive markings, sound and surroundings. Compare those observations with a field guide later. A partial identification, such as a bird group, is still progress. Do not invent details to make a candidate fit; return to the same area and practice recognizing a few common species.
Optional supplies on Amazon
Affiliate disclosure: As an Amazon Associate I earn from qualifying purchases. How our links work.
No. Several species look uniformly dark from afar. Compare its size with familiar nearby birds, then examine the bill, tail, color pattern and behavior. A small dark bird on a lawn should not become a crow identification simply because you cannot see its markings. Use several clues together and check which species occur in that region.
Color is only one part of identification. Distance and a silhouetted view can hide details, while age, sex or season may change a species’ appearance. Add its size, shape, behavior and habitat to your search. An outline, bill shape or feeding habit may narrow the field more effectively than a description such as small brown bird.
Many field guides place related species together, so similar bird families share a section. Use the index when you know a name but cannot find the page. Check both parts of a common name if needed: a guide may list American Robin under American, robin, or both. As you learn bird groups, those family sections become easier to browse.
Optional supplies on Amazon
Affiliate disclosure: As an Amazon Associate I earn from qualifying purchases. How our links work.
The same species can look different with age, sex, season or location. The extra pictures help you compare the bird you saw with the appropriate appearance. Read each image’s label before ruling out a species. A breeding adult’s bright colors may be a poor match for a juvenile or a bird in nonbreeding plumage.
Use Stationary when birding was your main activity, you know its start and duration, and you stayed within about 100 feet of the starting point. Use Traveling when you moved farther and can report the distance. For an out-and-back route, eBird asks for unique distance, excluding repeated trail sections. Record the actual outing rather than choosing the label that sounds more substantial.
Yes, use an Incidental checklist when gardening was your main activity and you simply noticed a bird. It is not a complete birding checklist. If you stop gardening and deliberately observe all birds you can identify for a measured period, that separate observation may qualify for Stationary or Traveling instead. Keep the activity and timing accurate.
Yes. Write a detailed description of the features you actually saw or heard and explain how you ruled out similar species. Even an imperfect photo or phone recording can help when it captures a useful feature. Use material from your own observation; an attractive photograph from another person or date is not evidence of your sighting.
Optional supplies on Amazon
Affiliate disclosure: As an Amazon Associate I earn from qualifying purchases. How our links work.
An unusually high count can need evidence just as an unusual species can. Explain whether you counted birds individually or estimated in groups, and describe the method clearly. A photo or recording from the observation may help. Do not treat the request as proof that your count is wrong; it is an opportunity to make the record understandable to reviewers.
Check the edges and likely perches first: posts, treetops and the transition into shrubs or reeds. Then scan the open ground slowly in adjoining rows instead of repeatedly glancing at one spot. This systematic approach can reveal birds that blend into the background. Observe from a suitable existing path or viewing place without entering sensitive habitat.
Pause instead of following it through cover. From an appropriate spot on the trail, sit or stand quietly and watch the area where it disappeared. Some ground-feeding birds may emerge again once the disturbance eases, though there is no guarantee. Practice waiting and observing; a missed identification is preferable to repeatedly pushing the bird farther away.
Avoid making playback a routine shortcut. The American Birding Association urges restraint with recordings, especially around rare or threatened birds and in heavily visited locations. Be particularly careful near nests, roosts and feeding sites. Listening quietly and watching from an appropriate distance lets you observe without deliberately drawing a bird away from what it is doing.
Prioritize avoiding disturbance over filling the frame. Keep back from active nests and nesting colonies, stay on appropriate paths, and use restraint when approaching or photographing. There is no universal close-up distance that makes every situation acceptable. If a better picture requires interfering with the birds or entering private property without permission, leave that picture untaken.
You can begin without one. Binoculars and identification resources cover many ordinary outings. A spotting scope becomes more useful for distant subjects such as waterbirds across a pond or shorebirds on mudflats. Try that style of viewing with a local birding group before deciding whether carrying and setting up extra equipment suits the outings you enjoy.
Optional supplies on Amazon
Affiliate disclosure: As an Amazon Associate I earn from qualifying purchases. How our links work.
A regional edition can be easier to carry and browse on local outings; a wider guide helps when traveling beyond that region. Check what area the book actually covers before buying. Free resources such as All About Birds and Merlin can also support identification. Choose a reference you can use comfortably rather than assuming the biggest book is always the best first purchase.
Optional supplies on Amazon
Affiliate disclosure: As an Amazon Associate I earn from qualifying purchases. How our links work.
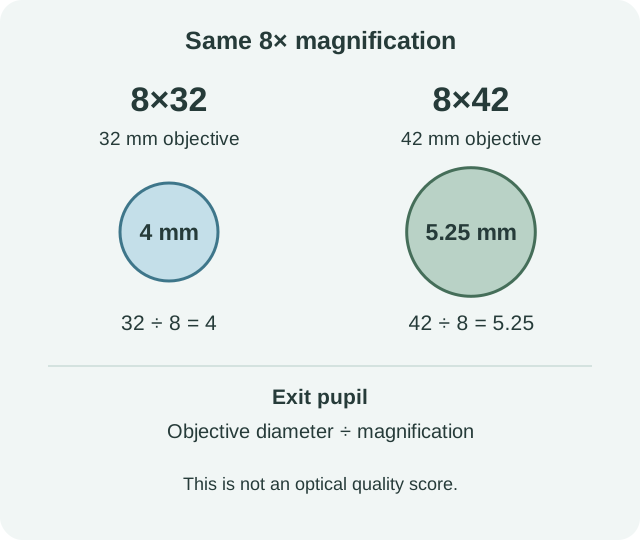
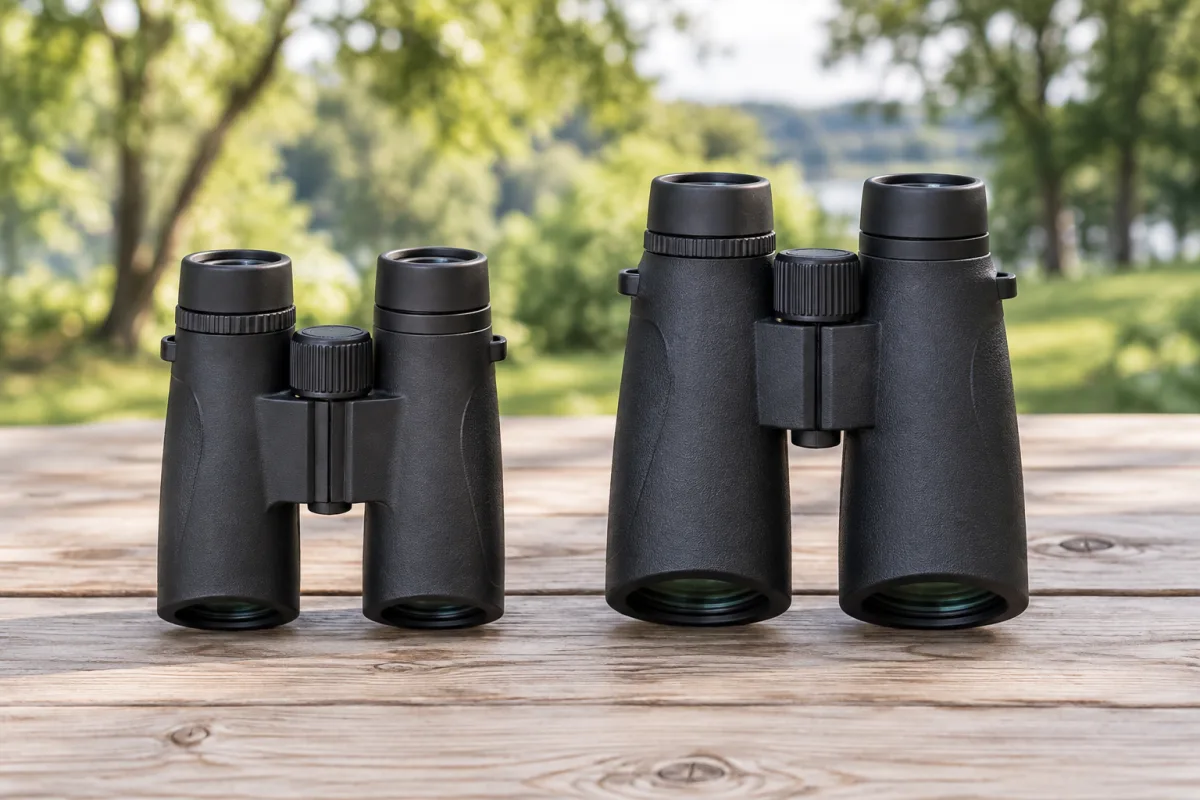
Both magnify eight times. Start with 8×32 for easier carrying or 8×42 when viewing in dim conditions matters more. Compare the actual models in your hands before choosing.
No. Exit pupil is the diameter of the light beam leaving the eyepiece. Eye relief describes where your eye sits to see the full view. Check both when comparing models.
They are different ways to express the view. Compare like units from the manufacturers’ specifications before deciding which is wider. Your usable view also depends on eye position.
Choose a familiar nearby place, watch one bird carefully, note what you actually observe and compare those clues with a guide. Start with the equipment you have; a confident identification is a bonus, not a requirement.
Yes. Begin by watching birds you can see comfortably. Use available equipment before deciding what a purchase would improve. A camera or spotting scope is not required for this first exercise.
Treat it as a suggestion to check. Compare your recording with the reference sounds and the circumstances of your observation before adding a confident identification to your notes.
An observation sketch only needs to preserve useful details. Labels, arrows, counts and rough shapes can be more informative than a polished picture. Keep drawing what you notice.