A jump-start is a temporary way to start a car with a discharged battery. These illustrations show a conventional 12-volt negative-ground vehicle. The owner’s manuals for both vehicles determine whether this method is allowed and which jump points to use.
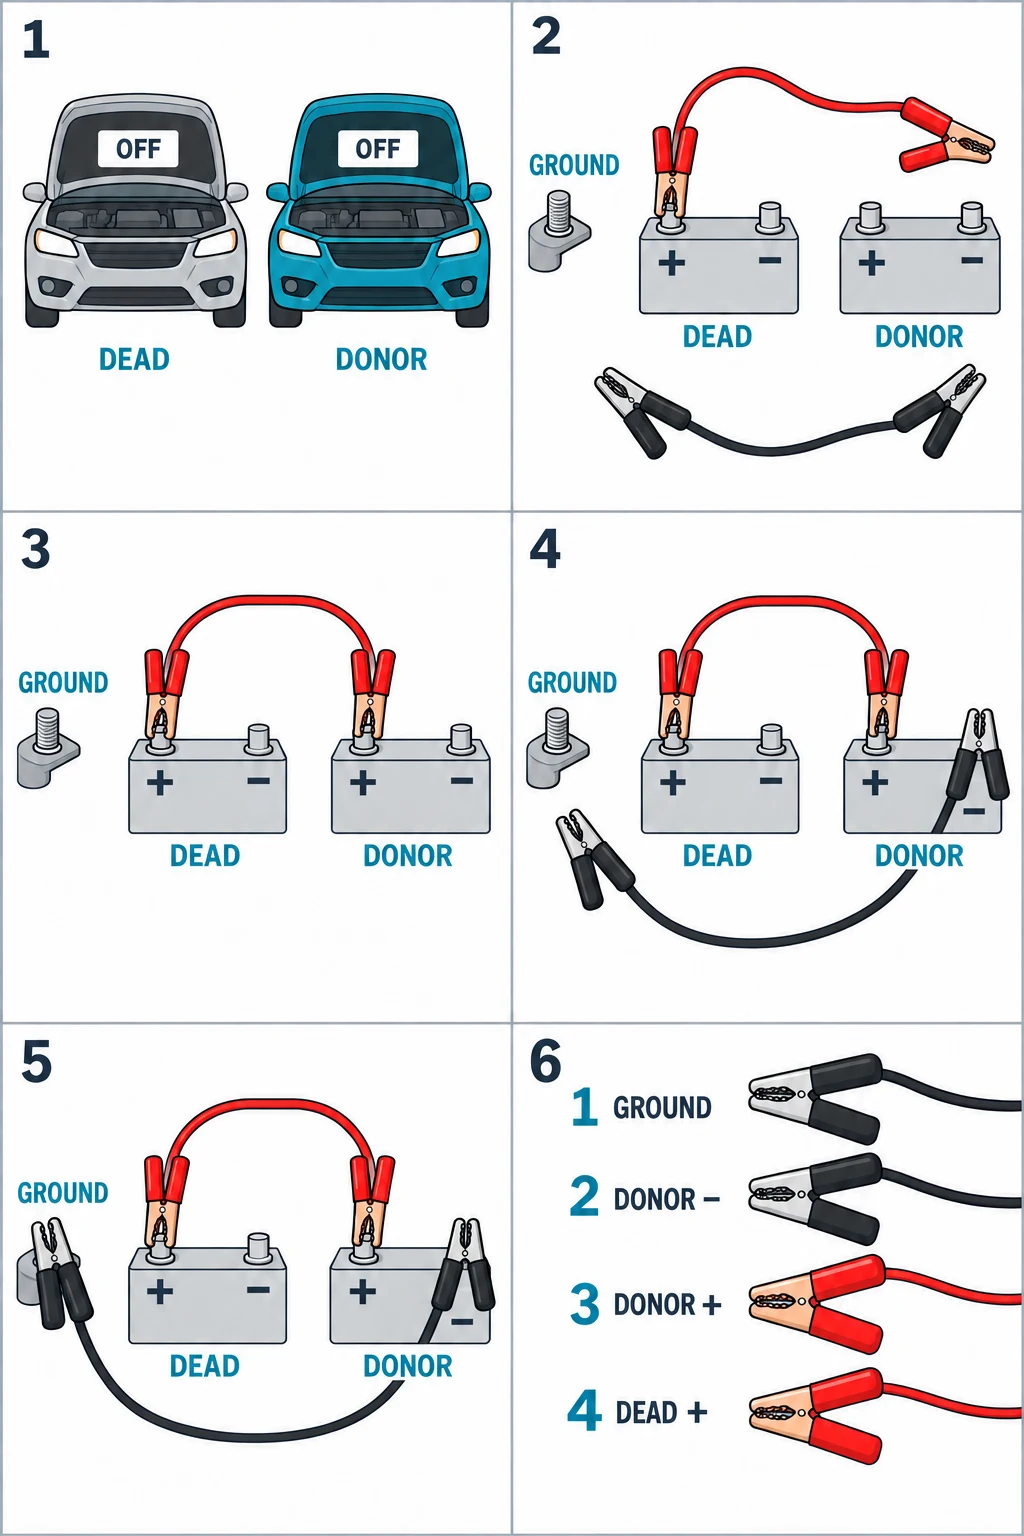
Connect red to discharged-car positive, red to donor positive, black to donor negative, then black to the approved ground on the discharged car. Follow the manuals to start, then remove in reverse order.
Go straight to the stepsBefore you begin
Do not jump a frozen, leaking, swollen, or damaged battery. Do not use this generic sequence on an EV, hybrid, or other system without its explicit instructions. Work away from traffic, flames, and enclosed spaces.
What you’ll need
- Both owner’s manuals
- Suitable undamaged jumper cables
- A permitted 12 V donor vehicle
- Eye protection and suitable gloves
Tools & supplies for this project
Affiliate disclosure: We may earn a commission when you buy through these Lowe’s links. How our links work.
Use what you already own. If you need supplies, compare these options with the requirements above and choose only the items your project needs.
Check Lowe’s for current price, availability and specifications.
Let’s do this
Step by step
- 01
Prepare both cars
Park close enough for the cables without touching. Apply parking brakes and select Park, or Neutral for a manual transmission. Turn ignitions and accessories off. Identify the approved positive and grounding points.
Open full-size image - 02
Red to discharged positive
Attach one red clamp to the discharged vehicle’s marked positive jump point. Keep the other clamps separated; never let them bridge terminals.
Open full-size image - 03
Red to donor positive
Attach the other red clamp to the donor vehicle’s marked positive point. Confirm both red connections before proceeding.
Open full-size image - 04
Black to donor negative
Attach one black clamp to the donor’s specified negative point. Keep leads clear of fans, belts, and hot components.
Open full-size image - 05
Black to the approved ground
Attach the final black clamp to the discharged vehicle’s manufacturer-approved ground away from its battery. Do not guess at a painted bracket, fuel line, or moving part. Where both manuals permit, start the donor and let it idle for the specified interval, then attempt to start the discharged car within its permitted cranking time. Stop if it will not start; do not keep cranking.
Ground location is schematic. Use the approved jump-start point in your vehicle’s manual.Open full-size image - 06
Remove in reverse order
After a successful start, follow the manuals for disconnection: discharged-car ground first, donor negative second, donor positive third, discharged positive last. Keep removed clamps apart and clear of machinery.
Open full-size image
Optional supplies on Amazon
Affiliate disclosure: As an Amazon Associate I earn from qualifying purchases. How our links work.
Use what you already have. These links open Amazon search results so you can compare suitable supplies; they are not individual product reviews.
If the engine still will not start
Stop repeated cranking and get assistance. A failed start can involve more than a discharged battery. Record whether you heard clicking, slow cranking, or normal cranking without ignition; that helps a technician understand the symptom.
After the jump
Arrange a battery and charging-system check. A short drive is not proof that a deeply discharged battery is fully charged. Keep the cables accessible, but do not treat repeated jump-starts as a repair.
A quick final check
- Both vehicles permit this procedure.
- The final black clamp used the approved ground.
- Removed clamps never touched.
- Battery follow-up is arranged.
Common questions & sticking points
Why is the last clamp away from the dead battery?
Making the final connection at the approved ground moves a potential spark away from battery gases.
Can any car be the donor?
No. Voltage and manufacturer restrictions matter, especially with hybrids and EVs. Check both manuals first.
Sources & further reading Optional
References used to check this guide. Follow your product’s own safety instructions where its design differs.
- AAA Via: Connection and disconnection order
- AAA Club Alliance: Jumper cables and precautions
- AAA: Battery safety and frozen batteries