The four-in-hand is a useful first necktie knot because it uses one wrap and produces a fairly narrow shape. Practise with the collar raised and a mirror at eye level. Work slowly enough to keep track of the wide end; that is the part doing most of the moving.
Wrap the wide end around the narrow end, pass it through the neck loop, and tuck it through the front band.
Go straight to the stepsBefore you begin
Start with the wide end roughly 12 inches lower. Adjust for your height and tie.
What you’ll need
- A necktie
- A collared shirt
- A mirror
Let’s do this
Step by step
- 01
Set the starting length
Face the diagrams as if looking in a mirror. Place the wide end on the picture’s left, hanging about 12 inches lower than the narrow end. Teal marks the wide end; gold marks the narrow end.
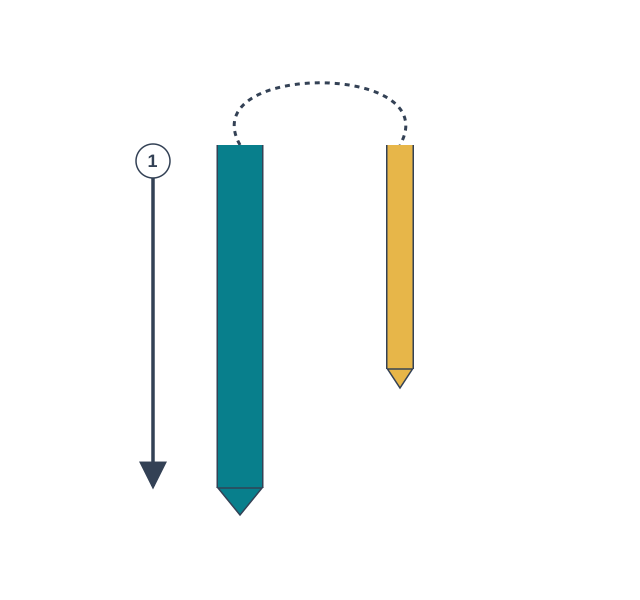
Front view: teal = wide end; gold = narrow end.Open full-size image - 02
Cross wide over narrow
Move the wide end across the FRONT of the narrow end, from the picture’s left to right. Keep the crossing loose.
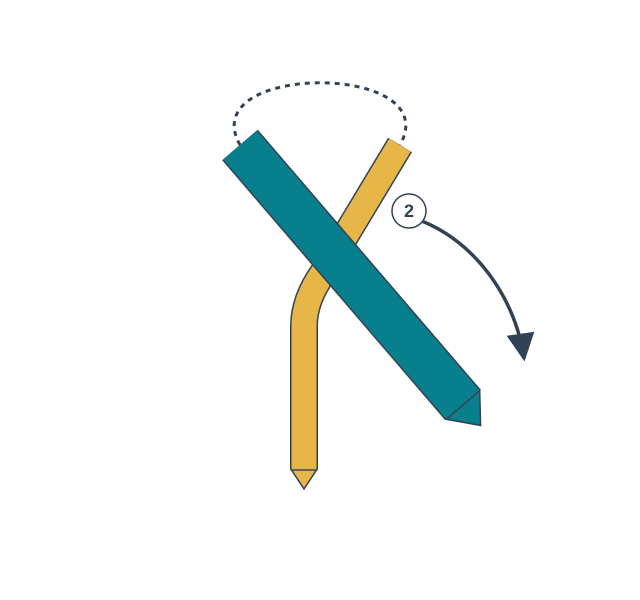
Open full-size image - 03
Wrap behind
Bring the wide end behind the narrow end, returning toward the picture’s left. The first crossing stays in place above this new crossing.
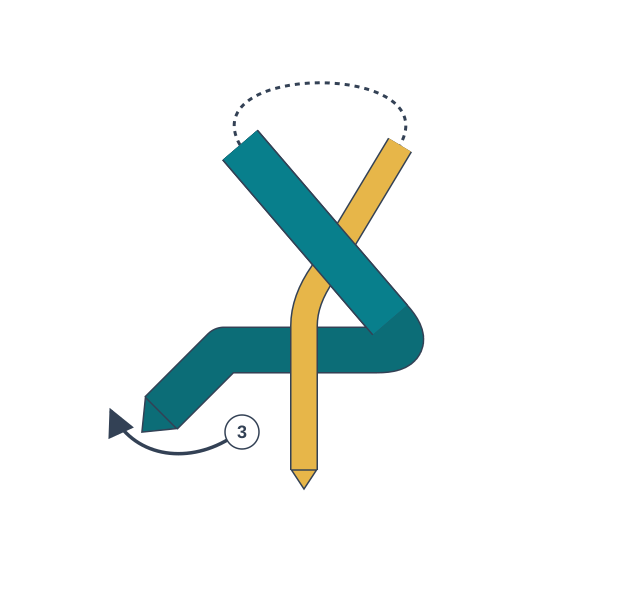
Open full-size image - 04
Make the front band
Bring the wide end across the front again, toward the picture’s right. Leave enough space behind this horizontal band for the tip to pass through later.
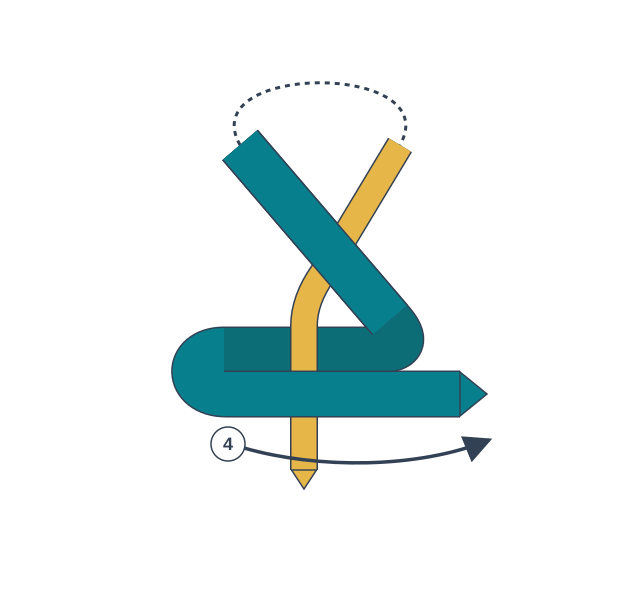
Open full-size image - 05
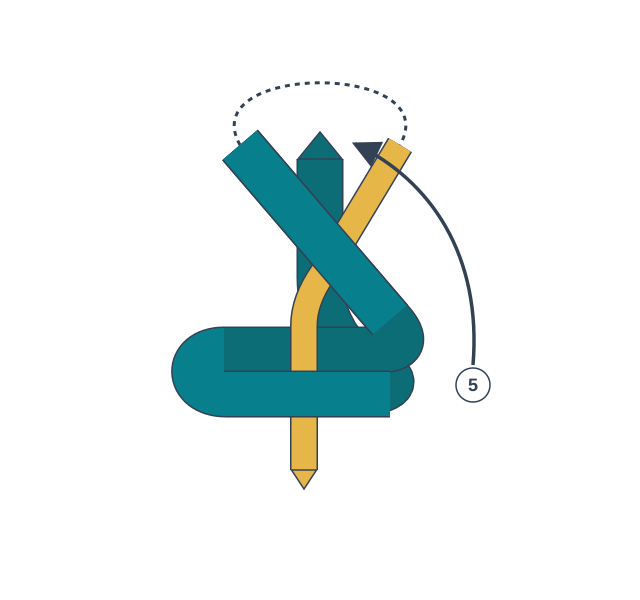
Come up through the neck loop
Bring the wide end up behind the knot and through the opening at your neck. Do not pass it through the front band yet.
Open full-size image - 06
Tuck down, then adjust
Guide the wide tip down through the loose front band. Pull it gently, hold the narrow end, and slide the knot toward your collar. The diagram leaves the tuck open so you can see its route.
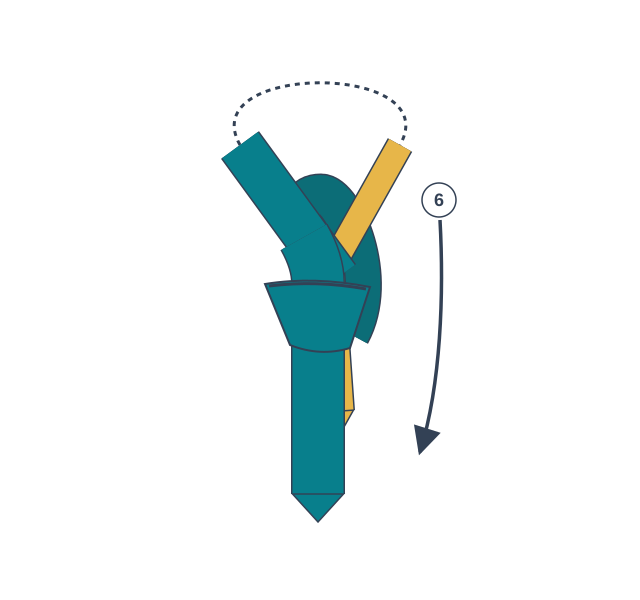
Loose tuck shown for clarity; tighten gently afterward.Open full-size image
Optional supplies on Amazon
Affiliate disclosure: As an Amazon Associate I earn from qualifying purchases. How our links work.
Use what you already have. These links open Amazon search results so you can compare suitable supplies; they are not individual product reviews.
Keep track of the two loops
The neck loop is the large opening around your neck. The front band is the small horizontal wrap on the face of the developing knot. These are not the same opening. If a step feels impossible, loosen the tie and identify both before pulling anything tighter.
Use a finger to preserve space behind the front band as you work. A common frustration is tightening that band too early, then having nowhere to pass the tip. Keep the fabric flat rather than twisting it into a cord. Once the route makes sense, practise the complete motion a second time without rushing.
Adjust length without starting from scratch mentally
If the wide end finishes too high, begin the next attempt with more length on that side. If it finishes too low, start with less. Make one small adjustment at a time and use the same knot. Your height, neck size, and the tie’s dimensions mean another person’s starting position may not be right for you.
For a useful practice check, lower your collar and look at the whole result rather than only the knot. See whether the collar sits comfortably and the ends lie neatly. Take a quick reference photo once you find a starting length that works for a particular tie; it is a simple reminder for the next occasion.
A quick final check
- The wide end went through the front band, not around it.
- The fabric lies flat and the collar feels comfortable.
- The finished length suits your shirt and outfit.
Common questions & sticking points
The knot is a little crooked. Is that wrong?
A four-in-hand is naturally slightly asymmetric.
Which opening does the wide end go through?
First it comes up through the neck opening in step 5. Then it goes down behind the front band in step 6. The pictures on this page show both openings.
Sources & further reading Optional
References used to check this guide. Follow your product’s own safety instructions where its design differs.
Last source check: September 21, 2026