The aim is a gradual transition across the joint, not a thick ridge hidden under paint. Start with one easy seam to learn how your compound spreads and dries. Paper tape and mesh tape can require different compounds; do not mix methods just because both products are called drywall tape.
Prepare sound joints, embed compatible tape in compound, then apply progressively wider thin coats with the required drying between them.
Go straight to the stepsBefore you begin
Work on dry, securely fastened board. Follow the tape/compound pairing and environmental requirements. Control dust, protect eyes and breathing as required, and assess older finishes before sanding.
What you’ll need
- Compatible joint compound and tape
- Taping knives in suitable widths
- Mud pan
- Corner bead for the specified outside-corner system
- Sanding equipment, dust control and protection
Let’s do this
Step by step
- 01
Prepare the joints and tools
Check fastener heads and remove loose debris. Prefill gaps as the system requires and let that material reach the correct stage. Clean dried lumps from knives and the pan so they do not scratch tracks through fresh compound.
- 02
Embed paper tape
For a paper-tape system, spread the recommended bed of compound, center the tape and press it in with a taping knife. Smooth from the middle toward the ends, leaving sufficient compound underneath for adhesion. Dry-looking bubbles indicate poor contact, not something paint will fix.
- 03
Treat corners and fasteners
Fold paper tape along its crease for inside corners and use the approved outside-corner bead system. Cover fastener dimples with thin compound. Keep inside-corner work controlled; finishing one side at a time can help avoid damaging the adjacent wet surface.
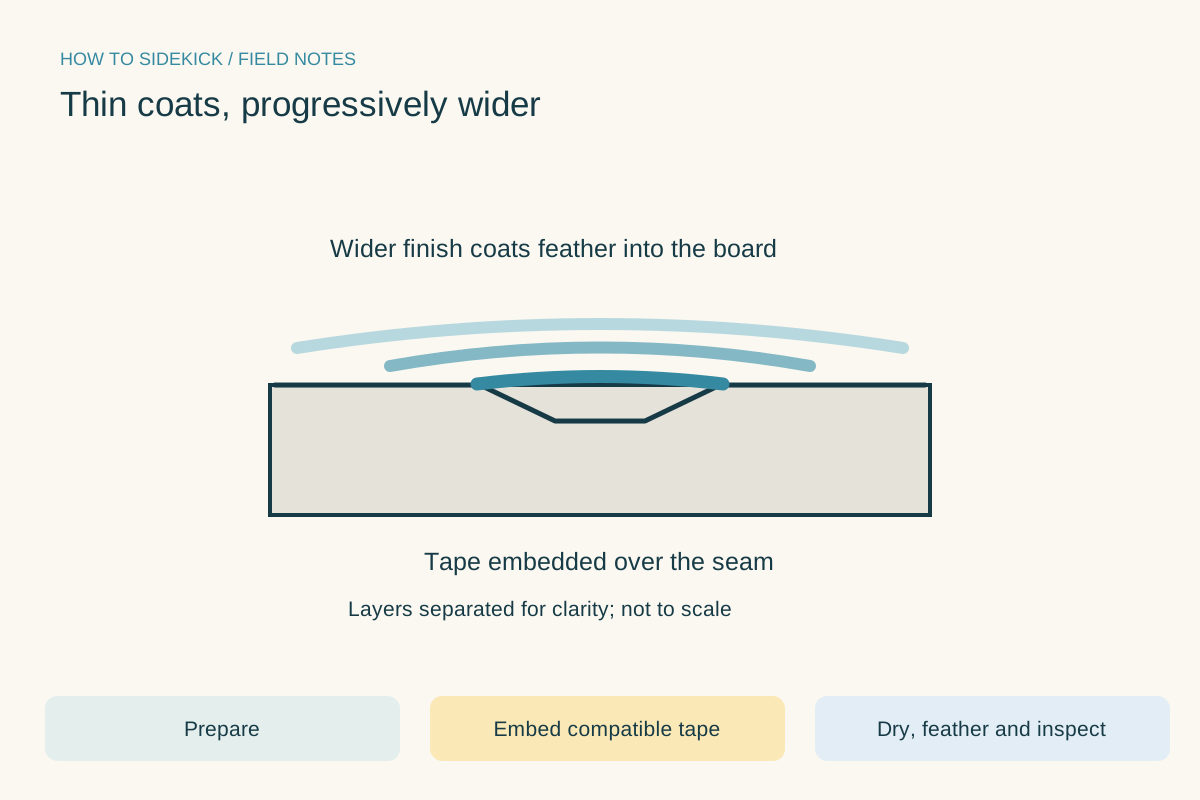
Thin coats, progressively wider. Use the instructions below for the full procedure.Open full-size image - 04
Build wider coats
After the previous coat reaches the required dry or set condition, remove high ridges and apply a wider, thin coat. Feather the edges into the board. Butt joints lack a recessed edge and often need a broader transition than tapered seams.
- 05
Inspect, smooth and prime
Let the final coat dry completely. Check with light across the surface, smooth high spots with the approved method and dust control, then remove dust. Apply a drywall-compatible primer before paint. Recheck after priming because it can reveal defects the bare compound hid.
Setting time is not always drying time
A setting compound can harden chemically while still containing moisture. Use its instructions for recoating, sanding and decorating. Ready-mixed drying compound depends on conditions such as coat thickness, temperature and humidity.
Fix bubbles before another coat
Cut out or repair loose tape according to the finishing system rather than burying the bubble. Additional compound over an unbonded tape pocket leaves the underlying fault in place.
A quick final check
- Tape and compound compatible
- No unbonded tape bubbles
- Coats feathered and dry
- Dust removed before primer
Common questions & sticking points
Can I use spackle instead of joint compound?
Use a joint-treatment system intended for board seams. Small-hole spackle is not a general substitute for embedding tape and finishing long joints.
How many coats do I need?
Use the system and finish level required for the wall. Several thin coats are commonly needed; the number alone does not guarantee a flat result.
Sources & further reading Optional
References used to check this guide. Follow your product’s own safety instructions where its design differs.
Last source check: September 24, 2026